
Door Handle Replacement
Door handles appear to be a small detail, but if you dislike the style or design of them, or are finding them difficult to use then it's time to replace them. With a bit of patience, you can install the new handle in no time.
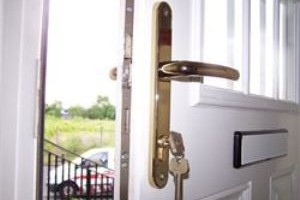
Modern door handles are usually equipped with cover plates which hide the screws to give them an attractive appearance. However, you'll have to attach them separately if the new handle doesn't already have them.
Remove the handle that was previously used
The door handle isn't only a decoration for your home It's also a safety feature that allows you to lock and unlock your door. But, over time the door handle could lose its grip, appear loose or start to look old and worn. This is a good indication that it's time to replace the door handle.
If your door handle is becoming difficult to use, it may be time to replace it. This is a serious problem because you won't be in a position to lock or unlock the door and put your family and yourself at risk.
Another reason to replace your door handle is if it's damaged or broken. A damaged or broken door handle could be quite dangerous, especially when your children or elderly family members are unable to open it, and get trapped in the. It's simple to fix a damaged handle on a door.
The majority of modern door handles are a standard size, so they will fit on any door. If you aren't sure if your new door handle will work, take out the old one and measure its housing holes. This will help you buy the correct sized door handle.
It is easiest to remove the door handle by unscrewing it from the door. Usually it is a matter of using a screwdriver. However, some door handles have a cover plate that conceals the screws that mount them, so you'll need to remove this to access the screws underneath. After you have removed the handle that was previously used, take note of the way in which the spindle is attached. This will help you align the new handle.
You can also remove the door handle by unscrewing the latch mechanism. This is typically done with an screwdriver however you'll need to locate the small latch, which should be at the edge of the trim piece. After removing the latch, unscrew the handle and the strike plate. Then remove the latch from the door's edge.
Take off the Strike Plate
If you are replacing your handle, you'll also be required to replace the latch plate, which is the hole that the door's latch hooks into when it closes. The new handles will have two latch plates that are circular and rectangular plate (see the above diagram that shows the parts of a door handle). If you have an rectangular latch plate, swap it with a circular one. This will allow the latch to be able to hook onto the strike plate, making the handle more convenient.
The first step is to unscrew the screw that's holding the latch plate that was previously in place. The screws are typically tight and require a fair amount of force to loosen them. RepairMyWindowsAndDoors might be beneficial to have a second person assist with this part if possible.
After the screws are removed and the latch plate will slide out of the door with ease. If the latch plate is stuck or won't move use a small file to scrape the edges. This may help free the plate.
Now, you can proceed to making the new door strike plate to be installed. Install the latch plate in the doorjamb using the wood screws that were included with the new handles. Don't over tighten your screws as this could damage the strike plate.
If you're unsure if the latch plate is in the right position, try closing and opening the door to see if it closes and latches correctly. If it doesn't, you will need to adjust the strikeplate up or down, forward or back until the door shuts correctly.
If the door is still moving or jiggles, then you may have to enlarge your latch hole on the strike plate. This is more frequent on older doors. It could be caused by wear and tear, hinges that are too narrow, the incorrect size of the latch or damaged strike plate. If this is the case, use a metal filing instead of a chisel, or hammer to adjust the strike plate.
Removal of the Latch
The latch is a curved metal piece which slides in and out of a hole on the inside of your door. The latch is moved forward when you turn the handle. It also catches the door frame so that the door is closed. If your door is wobbling when you close, replacing the latch could be all you need to fix the problem.
It's difficult to see the screws that attach the latch to the door, but there's usually a small slot on the trim plate that allows you to insert a screwdriver into the slot and remove it. Once you've removed the trim plate, it will be easy to remove the latch as well as the bolts that keep the latch and spindle in the position.
If the latch cannot be easily removed using a paperclip or tool to remove it from the handle mechanism. Insert the item into the latch's slot that is recessed and gently move it around until you feel the latch and handle begin to separate. You may have to repeat this procedure several times before you can remove the latch.
Once the old latch is removed, you should be able to insert the new latch into the slot without problems. Make use of the new screws to connect the latch to the strike plate or door frame. Make sure it is properly positioned in the slot and aligned with the screw chambers.
Before you install the new handle, make sure to measure your current backset (the distance from the centre of the large hole on the front of the door to the edge). Also, ensure that the size of the latch on the new handle is a good match to this measurement.
If you are replacing the latch or handle or handle, or if your previous lock cylinder has been damaged, then you'll require a new one. If you're not replacing the locks, however, a new latch will fit into the existing recess and work with the keys you have currently. Choose a latch that has rectangular cover plates that match your old handles.
Remove the cover plate
You can replace your old door handles with a modern lever and rose design to improve the look of your house. You can buy complete sets that include the escutcheons as well as privacy adaptors and escutcheons.
The first step in replacing the door handle inside is to remove the cover plate or rose, which hides the screws and mechanism inside. Look for an release tab on the plate and use a flathead screwdriver to pop it off the knob. It could have an opening on one side or be secured by a pin.
Once the cover plate is off take the screw that holds the inside handle in place and put it aside. It is also necessary to remove the screws that are holding the latch and inner plates to the door, which you can accomplish by loosening them using a Philips screwdriver. Take the inner plates and latch from the door. Place them aside.
Most doors have an opening between the door jamb and the edge of the frame that makes room for a handle, but not all have. If yours isn't have a handle, you'll need to make a hole into the door. This is the same procedure as opening a locked door however you'll have to be extra careful not to scratch the door or frame.
Installing new door knob screws is necessary after holes have been drilled. Make sure to buy the same size as the old ones, so that you won't have the handle that is too tight or too loose. Installing a new strike rod and latch is also necessary. These aren't included in the majority of door handle sets.
Amazon's Choice FAERSI 2-piece chrome finish handle sets are a great option if you're in need of a premium interior door handle replacement set. It's a factory-fit product and has been praised with hundreds of five-star reviews. It's an excellent option to replace worn or damaged interior door hardware on your Chevy.